|
Step
|
Action
|
Description |
| 1 |
User zonecfg to configure a Inherited Pacakage Zone |
| 1a |
# zonecfg -z myzone |
Start the zonecfg command with a -z option followed by name of the zone that is to be created.
- Zone names are case sensitive. Zone names must begin with an alphanumeric character and can contain alphanumeric characters, the underscore (_) and the hyphen (-). The name global and all names beginning with SUNW are reserved and cannot be used.
The prompt will change to zonecfg: myzone> and issue a response to use the create option.
global# zonecfg -z myzone
myzone: No such zone configured
Use 'create' to begin configuring a new zone.
zonecfg:myzone>
|
|
| 1b |
zonecfg:myzone> create |
Enter the create parameter to begin the configuration of a new zone.
global# zonecfg -z myzone
myzone: No such zone configured
Use 'create' to begin configuring a new zone.
zonecfg:myzone> create
zonecfg:myzone>
|
In this initial creation, a sparse root zone is configured with the lof filesytems from the global zone. To see this default configuration, use the info options
zonecfg:myzone> info
zonename: myzone
zonepath:
brand: native
autoboot: false
bootargs:
pool:
limitpriv:
scheduling-class:
ip-type: shared
inherit-pkg-dir:
        dir: /lib
inherit-pkg-dir:
        dir: /platform
inherit-pkg-dir:
        dir: /sbin
inherit-pkg-dir:
        dir: /usr
zonecfg:myzone>
|
|
| 1c |
zonecfg:myzone> set zonepath=/zones/myzone |
| |
Use set zonepath= to set up the loopback filesystem for the zone that will be built on the global zone.
zonecfg:myzone> set zonepath=/zones/myzone
zonecfg:myzone>
|
|
| 1d |
zonecfg:myzone> set autoboot=true
|
| |
Use set autoboot= to set autoboot of the zone to either true or false.
zonecfg:myzone> set autoboot=true
zonecfg:myzone>
|
You can also set other parameters in this section such as limitpriv, scheduling-class, and ip-type. Set Setting Other Zone Parameters. If not they will be set to the default. |
| 1e |
zonecfg:myzone> add inherit-pkg-dir (optional)
|
| |
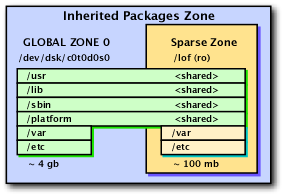
By default a zone will inherit packages from /lib, /platform, /sbin, and /usr. These directories will be read-only and reside on the global zone. Therefore they will not add any disk space to the new zone configuration. You can also add an additional inherited package directory by using the add inherited-pkg-dir option.
Use add inherited-pkg-dir to set an inherited package directory. Once the command is issued the prompt will change to inherit-pkg-dir>. Use set dir= to assign an inherited directory. Use end to complete the assignment of an inherited package directory.
zonecfg:myzone> add inherit-pkg-dir
zonecfg:myzone:inherit-pkg-dir> set dir=/opt/sfw
zonecfg:myzone:inherit-pkg-dir> end
zonecfg:myzone>
|
|
| 1f |
zonecfg:myzone> add net |
| |
Setup the primary network by using the add net option. Set the interface ip address using the set address=xxx.xxx.xxx.xxx/yyy where xxx.xxx.xxx.xxx is a valid ip address and yyy is the associated netmask (e.g. 24 = 255.255.255.0). Next assign the physical interface using the set physical= and giving the name of a physical interface. Finally defined a default router (e.g. defrouter=). Use end to complete the assignment of this interface. Additional interface can be also defined at this point. Using the same physical device name for multiple network interfaces will increment in order with a multiple plumb set (e.g. ie0:1, ie0:2, ie0:3).
zonecfg:myzone> add net
zonecfg:myzone:net> set address=192.168.3.34/24
zonecfg:myzone:net> set physical=rtls0
zonecfg:myzone:net> set defrouter=192.168.3.1
zonecfg:myzone:net> end
zonecfg:myzone>
|
|
|
| 1g |
zonecfg:myzone> commit |
Display the configuration with the "info" option. Use "verify" to verify the current configuration has all of the required properties and that a zonepath is specified. Use "commit" to move configuration from memory to perminent storage. Use exit to complete the configuration and save it and exit the zonecfg command.
zonecfg:myzone> info
zonepath: /zones/myzone
brand: native
autoboot: true
bootargs:
pool:
limitpriv:
ip-type: shared
inherit-pkg-dir:
        dir: /lib
inherit-pkg-dir:
        dir: /platform
inherit-pkg-dir:
        dir: /sbin
inherit-pkg-dir:
        dir: /usr
inherit-pkg-dir:
        dir: /opt/sfw
net:
        address: 192.168.3.36/24
        physical: rtls0
        defrouter: 192.168.3.1
zonecfg:myzone> verify
zonecfg:myzone> commit
zonecfg:myzone> exit

global#
|
| Note: |
"commit" also performs the verify function. |
This configuration is saved in the /etc/zones directory as an xml file:
global# cd /etc/zones
global# ls
SUNWblank.xml    SUNWlx.xml       global.xml       myzone.xml
SUNWdefault.xml  SUNWtsoldef.xml  index
global# cat myzone.xml
<?xml version="1.0" encoding="UTF-8"?>
<!DOCTYPE zone PUBLIC "-//Sun Microsystems Inc//DTD Zones//EN" "file:///usr/share/lib/xml/dtd/zonecfg.dtd.1">
<!--
    DO NOT EDIT THIS FILE.  Use zonecfg(1M) instead.
-->
<zone name="mysparse" zonepath="/zones/myzone" autoboot="true">
  <inherited-pkg-dir directory="/lib"/>
  <inherited-pkg-dir directory="/platform"/>
  <inherited-pkg-dir directory="/sbin"/>
  <inherited-pkg-dir directory="/usr"/>
  <network address="192.168.3.36/24" physical="rtls0" defrouter="192.168.3.1"/>
</zone>
global#
|
The index file in this directory also contains the entry:
global# cat index
cat index
# Copyright 2004 Sun Microsystems, Inc.  All rights reserved.
# Use is subject to license terms.
#
# ident "@(#)zones-index        1.2     04/04/01 SMI"
#
# DO NOT EDIT: this file is automatically generated by zoneadm(1M)
# and zonecfg(1M).  Any manual changes will be lost.
#
global:configured:/:
myzone:configured:/zones/myzone:
global# zoneadm list -cv
  ID NAME             STATUS         PATH                           BRAND    IP
   0 global           running        /                              native   shared
   1 selfzone         running        /export/home/selfzone          native   shared
   2 rlogic           running        /zones/rlogic                  native   shared
   3 utility          running        /zones/utility                 native   shared
   - myzone           configured     /export/home/myzone            native   shared
-bash-3.00#
|
|
| 2 |
Use zoneadm to verify an install the new zone
|
|
# zoneadm -z myzone install
|
|
|
Use zoneadm with the -z the zone name and the install option. This will generate an output showing the progress as the file system is created and written.
global# zoneadm -z myzone verify

WARNING: /export/home/myzone does not exist, so it cannot be verified.
When 'zoneadm install' is run, 'install' will try to create
/zones/myzone, and 'verify' will be tried again,
but the 'verify' may fail if:
the parent directory of /export/home/myzone is group- or other-writable
or
/export/home/myzone overlaps with any other installed zones.
global# zoneadm -z myzone install
Preparing to install zone <myzone>.
Creating list of files to copy from the global zone.
Copying <2435> files to the zone.
Initializing zone product registry.
Determining zone package initialization order.
Preparing to initialize <1099> packages on the zone.
Initializing package <469> of <1099>: percent complete: 42%
.......  .......     ...........   ..........    .........
.......  .......     ...........   ..........    .........
Initialized <1099> packages on zone.
Zone <myzone> is initialized.
The file </zones/myzone/root/var/sadm/system/logs/install_log>
contains a log of the zone installation.
global#
|
| Notes: |
- Running the "zoneadm -z <zonename> verify" when the zone directory does not exist will issue the above warniing message which is harmless in this case. You may avoid the error message by creating the zonename directory and giving is a protection of 700.
- Creation of a self contain zone to the zone directory the contents of /usr, /lib, /sbin and /platform directories of the global zone. Creationof a self contained zone typically consumes about 100MB of disk space.
- If the <zonename> directory directory does not exist. It will be create with the right protection and ownership.
|
After a zone is installed the index file in the /etc/zones will be updated.
global# cat /etc/zones/index
# Copyright 2004 Sun Microsystems, Inc.  All rights reserved.
# Use is subject to license terms.
#
# ident "@(#)zones-index        1.2     04/04/01 SMI"
#
# DO NOT EDIT: this file is automatically generated by zoneadm(1M)
# and zonecfg(1M).  Any manual changes will be lost.
#
global:configured:/:
mysparse:installed:/export/home/myzone:fd223204-df1a-6669-d951-ba8bc795347a
global# /usr/sbin/zoneadm list -vi
  ID NAME             STATUS         PATH                           BRAND    IP
   0 global           running        /                              native   shared
   1 utility          running        /zones/utility                 native   shared
   2 rlogic           running        /zones/rlogic                  native   shared
   3 myzone           installed      /export/home/selfzone          native   shared
global#
|
|
| 3 |
Use zoneadm -z <zonename> boot to boot the zone. |
| # zoneadm -z myzone boot |
|
Boot the new zone by issuing zoneadm -z <zonename> boot.
global# zoneadm -z myzone boot
global# /usr/sbin/zoneadm list -vi
  ID NAME             STATUS         PATH                           BRAND    IP
   0 global           running        /                              native   shared
   1 utility          running        /zones/utility                 native   shared
   2 rlogic           running        /zones/rlogic                  native   shared
   3 myzone           running        /export/home/selfzone          native   shared
global#
|
| Notes: |
- If for some reason the zone initiation fails or cannot be booted, you must uninstall the zone prior to installing it again.
Use zoneadm -z <zonename> uninstall
|
|
| 4 |
Use zlogin to bring up the new zone |
|
# zlogin -C myzone
|
Use zlogin <zonename> -C to login to the new zone at its console. This will take you through the normal configuration questions as it you had boot a new installation for the first time. You will be asked to set timezone, network and hostname.
global# zlogin -C myzone
[Connected to zone 'myzone' console]
[NOTICE: Zone booting up]
SunOS Release 5.11 Version snv_23 64-bit
Copyright 1983-2005 Sun Microsystems, Inc.  All rights reserved.
Use is subject to license terms.
Hostname: myzone
Loading smf(5) service descriptions: 107/107

Select a Language
0. English
1. Czech Republic (ISO8859-2)
2. Czech Republic (UTF-8 + euro)
3. German
4. es
5. fr
6. Hungary (ISO8859-2)
7. Slovakia (ISO8859-2)
Please make a choice (0 - 7), or press h or ? for help:
..... ......... ........... ......... ........ .......
..... ......... ........... ......... ........ .......
..... ......... ........... ......... ........ .......
|
Using zlogin from the global zone is as if you had login from the console. To exist this consol login and return to the global zone simply enter a tilda dot:
~.
This will return back to global zone.
myzone console login: ~.
[Connection to zone 'myzone' console closed]
global#
|
|
| 5 |
Use zoneadm list to show status of current zone |
| # /usr/sbin/zoneadm list -vi |
|
On the global zone, use the zoneadm list -vi to show current status of the new zone
# /usr/sbin/zoneadm list -vi
  ID NAME             STATUS         PATH                           BRAND    IP
   0 global           running        /                              native   shared
   2 rlogic           running        /zones/rlogic                  native   shared
  10 utility          running        /zones/utility                 native   shared
  12 myzone           running        /zones/myzone                  native   shared
#
|
|