|
||
|
|
|


 Installation Road map
Data transfer options for the q-Status™ Windows collection scripts support using secure copy. The following outlines how to set up such an option which will automatically transfer the collected data to the q-status™ Windows web server to the data/ directory.
Note: The ANT transfer method provided in q-Status™ Windows is the same type of secure data transfer where data is encrypted when sent. the ANT transfer method does not require that ssh be installed on the Windows server (e.g. putty). The ANT transfer method is much easier to configure and does not require that ssh pairs be enabled that would allow changing to that user to obtained access to the q-Status™ web server without using a password. To automatic the processes requires:
LogiQwest provides a zip file of all the collection scripts and programs (including putty) required for q-Status™ Windows support for automatic secure copy transfer of q-Status™ Windows data to a q-Status™ Web Server. Downlowd collection scripts and programs by clicking HERE (
- that Putty (ssh software) be installed or distributed to each Windows client server and placed in the q-Status™ Windows bin\ directory.
- that the transfer bat file 'sshXFER.bat' be edited to add transfer configuration parameters (e.g. q-Status™ Web server named, transfer user and directory location where data is to be sent).
- that a q-Status™ transfer user be create on each Windows client matching the same transfer user on the q-Status™ Web server.
- that a public and private key generate for this user for each Windows client server.
- that the Windows created public key be modified to match a Unix/Linux implementation for the q-Status™ Windows Web Server.
- that the public key be added to the transfer user's "authorized_keys"
) 553kb.
Windows SSH Software
Windows does not come with SSH software. The commonly used Freeware Windows Putty is used for SSH transfer. This must be downloaded and installed on each Windows server client. Putty can be obtained from the Internet at:http://www.chiark.greenend.org.uk/~sgtatham/putty/download.html
LogiQwest provides two downloads with q-Status™ Windows from this site that are required to create an automated ssh transfer processes through a bat script.
pscp.exe - A windows implementation of scp. puttygen.exe - A Windows implementation ssh-keygen to create the private and public keys. Place these software programs in the C:\Program Files\Logiqwest\q-statusWindowsDesktop\ directory for Windows Desktop architecture and C:\Program Files \Logiqwest\q-statusWindowsServer\ directory for Windows server architecture.
Setting Up the sshXFER.bat file
Click Here to donwload q-statusWindows™ ssh additions software (
)
To use the SSH transfer script called sshXFER.bat, requires the secure SSH file transfer system to be used in its place. The sshXFER.bat is located in the C:\Program Files\Logiqwest\q-statusWindowsDesktop\ directory for Windows Desktop architecture and C:\Program Files \Logiqwest\q-statusWindowsServer\ directory for Windows server architecture for this purpose. It must be edited or distributed to each Windows client servers and the following parameters assigned:
|
SSHHOST |
hostname or ip address of q-status™ Windows web server. |
|
SERVERDIR |
directory on q-status™ Windows web server were files are to be sent |
|
SSHUSER |
ssh user |
rem # Modify these entries for SCP transfer ###################### |
Setting Up an SSH Transfer User
For Unix:
To implement SSH transfer requires the creation of a transfer user.
For Unix:
To enable ANT or ssh collection processes, requires that a q-Status™ transfer user be established on the q-Status™ web server. This can be accomplished using useradd. In our example, we will established a q-Status™ transfer user home directory as q-statusLinux directory of web server (e.g. /var/www/html). Below is an example using useradd and creating a password for that user on the q-Status™ Web server.
q-Status™ Server
Notes:
- When q-Status™ is delivers, it has set user and group as 70:70. In some Unix system this group and user is already defined as user and group as www:www or something else. Sometimes this group and user already exist on a Linux system. The customization of this user can group is left to the user.
- The qStatus™ user is set to run as a Bourne shell. Make use the default shell is Bourne.
Make sure the directory is owned by the q-Status™ user. Create the .ssh directory using ssh-keygen. For now we don't want to use the created keys, but ssh creates all required directories and files and sets the appropriate ownerships.
[q-server]# pwd /home/qstatus [q-server]# ssh-keygen -t rsa Generating public/private rsa key pair. Enter file in which to save the key (/home/q-status/.ssh/id_rsa): <just enter a return> Created directory '/home/qstatus/.ssh'. Enter passphrase (empty for no passphrase): <just enter a return> Enter same passphrase again: <just enter a return> Your identification has been saved in /home/qstatus/.ssh/id_rsa. Your public key has been saved in /home/qstatus/.ssh/id_rsa.pub. The key fingerprint is: 2d:ef:24:2b:be:75:25:67:5e:53:5d:67:e7:a4:30:ef qstatus@q-server [q-server]# ls -a total 8 drwxr-xr-x 3 qstatus www 512 Jan 13 17:53 . drwxr-xr-x 12 root root 512 Jan 13 15:37 .. -rw------- 1 qstatus www 778 Jan 13 17:53 .bash_history drwx------ 2 qstatus www 512 Jan 13 16:26 .ssh [q-server]# |
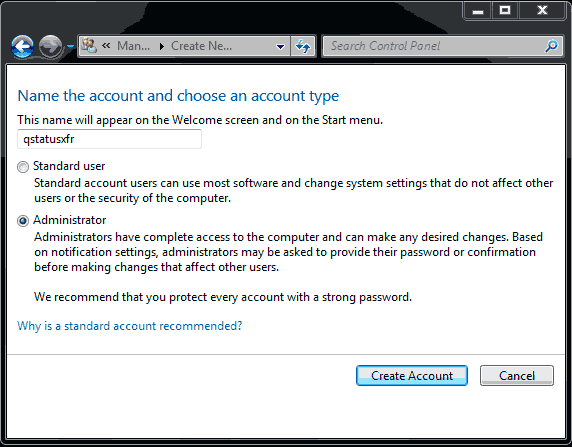
For Windows:
Under the Windows "User Accounts" GUI create a transfer user with "Administrative" privileges on each Windows Client. Privileges is very important particularly in Windows 8 and Windows Server 2012.
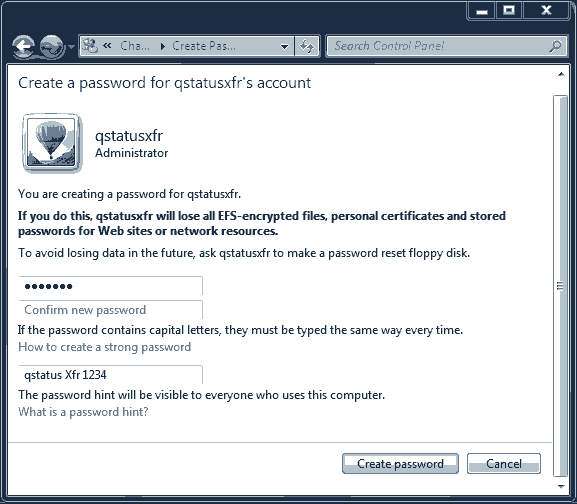
Assign the same password to this user as on the q-Status™ Web server.
Generating SSH Key Pairs using Putty
Login to each Windows client server as the transfer user and create a private and public key pair using puttygen.exe. You can use the Windows Explorer and change to the q-Status™ install directory (e.g. C:\Program Files\Logiqwest\q-statusWindowsDesktop\ directory for Windows Desktop architecture and C:\Program Files \Logiqwest\q-statusWindowsServer\ directory for Windows server architecture). Then double click on puttygen.exe.
Select SSH2 RSA as the key type and use 1024 bits for the key length. Click on Generate.
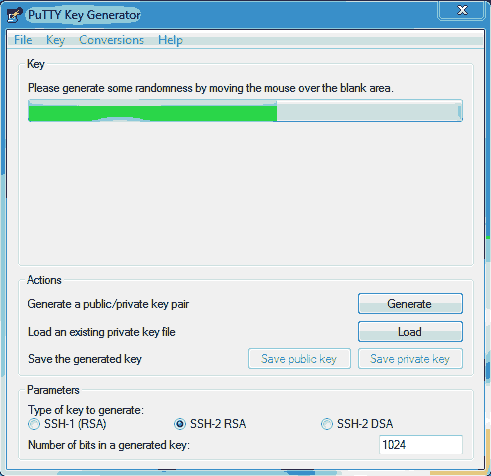
Move the mouse over the Putty blank area as requested to create some random numbers for the key files. After that your keys will be created. Now save the keys.
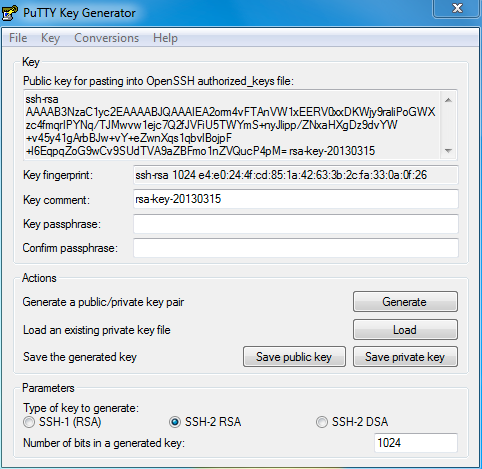
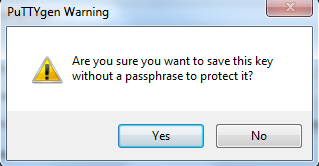
Click on "Save public key" and on "Save private key" to write the generated keys to file. Don't enter a key passphrase when prompted or the automation will not work.
Call the files "%computername%.pub.ppk" and "%computername%.prv.ppk" and store them in the install directory C:\Program Files\Logiqwest\q-statusWindowsDesktop\ directory for Windows Desktop architecture and C:\Program Files \Logiqwest\q-statusWindowsServer\ directory for Windows server architecture). These names are very important. Do not change them. Finally exit puttygen.exe.
Registering the key on the q-status™ Windows server
On the Windows Client:
Next log into the Windows server as the administrative user. You need to copy the key file to the q-Status™ Web server the public key (e.g. %computername%.pub.ppk) and convert it to the Unix/Linux ssh format. After that the key can be registered in the ssh authorized_keys file.
On the q-Status™ Window client open a DOS or Powershell terminal and copy the public key file to the q-Status™ Web server using pscp.exe command from the command line.
C:\Program Files\LogiQwest\q-statusWindowsDesktop>pscp MERCURY.pub.ppk qstatus@q-server:/home/qstatus/.ssh C:\Progtam Files\LogiQwest\q-statusWindows\Desktop\bin>sshXFERput.bat |
Note: The prompt to store the "ssh-rsa key" in the Putty Cache, must be answered just once as yes and must be accomplished by the administrative user to automate the process by a bat file.
On the Linux/Unix q-Status™ Web Server:
Login to the q-Status™ Web server and convert the key file to the Unix ssh format. In the .ssh directory of the q-Status transfer user, edit the copied public key files from Windows to convert it to Unix format.
|
From |
---- BEGIN SSH2 PUBLIC KEY ---- |
|
To |
ssh-rsa AAAAB3NzaC1yc2EAAAABJQAAAIB/mpItTdE33sXRZKxhBUwS7EITuOef/20KaZ6DtwSmw/tsQ8W9uk VThITh/3Y7k8mX3s1iVfsYRt/qI0+Bd4xJn6YqwIM+Ed10A6RLD2W/f9do+zMSZuaG9olQMXyVAV1md3fn5o Glqf3SEZAxrR/nXd6mUK525/ti9N0vtHhp1Q==qstatus@q-status-server |
The key file needs to contain one line only starting with ssh-rsa, a space followed by the key with no line breaks and ending with <user@q-status-server>. You can use the id_rsa.pub file in the same .ssh directory compare created by ssh-keygen. At the end concat the content of your "<hostname>.pub.ppk" to the authorized_keys file used by ssh.
bash-2.05$ pwd
/export/home/qstatus/.ssh

bash-2.05$ ls
MERCURY.pub.ppk  id_rsa           id_rsa.pub

bash-2.05$ cat MERCURY.pub.ppk
---- BEGIN SSH2 PUBLIC KEY ----
Comment: "rsa-key-20060113"
AAAAB3NzaC1yc2EAAAABJQAAAIEAxIZjmAHXTbge/uLRArSnjQcZ+fGojphm+mlE
IKLmGdUKtQTBB2Mw1sClvpTXmzX+LH6Td5wIRjqFSnZPaSVodsouubmiOXj2qabb
1DYboiGqJIbhGIdWBDIeoeDcpxHeOQL3iG5cVydJlveG3RhsYQjlh8gpeSNbQyXt
JJsXBm8=
---- END SSH2 PUBLIC KEY ----

bash-2.05$ vi MERCURY.pub.ppk
ssh-rsa AAAAB3NzaC1yc2EAAAABJQAAAIEAxIZjmAHXTbge/uLRArSnjQcZ+fGojphm+mlEIKLmGdUKtQTBB2Mw1sClvpTXmz
X+LH6Td5wIRjqFSnZPaSVodsouubmiOXj2qabb1DYboiGqJIbhGIdWBDIeoeDcpxHeOQL3iG5cVydJlveG3RhsYQjlh8gpeSNb
QyXtJJsXBm8= Administrator@MERCURY
:wq

bash-2.05$ cat MERCURY.pub.ppk >> authorized_keys
|
You have now configured ssh to accept logins without prompting for a password from the q-Status™ client using the private key. That makes it possible to copy the client data automatically.
To create other client server logins to the q-status™ Windows web server, concat (>>) the "authorized_keys" file with other public keys from other client servers that have been transferred with different names and repeat the step above on the q-status™ Windows web server.
To test the connect, try to copy the key file from transfer server again, using pscp command and the "-i" parameter. Through this parameter you tell putty to use the specified key.
C:\Program Files\LogiQwest\q-status>pscp -i MERCURY.prv.ppk MERCURY.pub.ppk qstatus@q-server:/home/qstatus/.ssh
|
If you are not prompted for a password, everything is configured correctly. Otherwise it might be helpful to view the log files to find out the reason, why the login was not accepted.
Setting Up the list_configs.bat file
To enable the transfer batch file, comment out the line in the list_configs.bat and list_configs_disks.bat files. Make sure to assign the parameters in the sshXFER.bat.
list_configs.bat example rem call qstatusANTput.bat call sshXFERput.bat
Data will then automatically be transferred each time the scheduler runs the data collection.
Note: Since the public and private keys are stored in the q-Status™ Windows program, the q-Status™ user can be removed from the Windows server and the scp copy will still continue to function.
Setting Up the Scheduler Entry
To automate the process, simply add an entry to the server client Scheduled Tasks. This can be accomplished by accessing the Windows Scheduler Manually or by run the bat program that automatically sets them up.
Two Schedule task are required. One that called list_config.bat and the other that calls list_config_disks.bat. Typically list_config.bat is called once a day and list_config_disks.bat is called every hour.
Click on "Start - Programs - Accessories - System Tools - Scheduled Tasks" to start the Windows Scheduler.
Using Bat Scripts To Update Scheduler
To use the BAT script to update the Scheduler, For both 32 and 64 bit Windows architecture Included run the appropriate script bellow:
C:\Program Files\LogiQest\qStatusWindowsDesktop\bin\q-status_add_schtashs.bat
and
C:\Program Files\LogiQest\qStatusWindowsServer\bin\q-status_add_schtashs.bat
This bat file will add the two required tasks. Edit this bat file to change the time the schedule performs the task.
Note: You can remove the two schedules by running the q-status_delete_schtasks.bat in the same directory.
Using Windows Scheduler
GUI
Click on "Add Scheduled Task" to start the wizard.
Click next. Click on browse to choose
"C:\Program Files\LogiQwest\q-statusWindowsDesktop\bin\list_configs.bat"
or
"C:\Program Files\LogiQwest\q-statusWindowsServer\bin\list_configs.bat"
as the Program to schedule.
After that define the user you want to execute the collection program.
Finally set the frequency and time you want the data to be collected.
Note: In the q-statusWindows Directory is a bat script called "q-status_add_schtashs.bat". This came be execute to add the schedule, but does need to be modified for the specific environment. This bat file is currently unsupported.
Wait for the next runtime and verify that it is working. At this point, automatic collection is enabled and q-status™ Windows will work properly. The installation is complete.